Since I started this blog (my personal site), my main goal is to learn while I code. Of course, there is another very important reason is to share what I have learn to whoever is reading this, because I believe sharing knowledge it’s for the greater good. For this reason, I am writing this “tutorial” like blog on how to integrate Google Analytics into your Next.js site. At first I was looking through other people's ideas and blogs, wanted to check to see how they did it. I have tumbled upon a method where I have to setup faunaDB to store the page views count into database and query from there. But to be honest, it was a lot of work for such a small task, and also everytime page rerenders there will be a chance that the page view data updates twice, or more than that even. There were definitly a way to get around this issue but since my blog don't require that much stuff, so I had to look around a bit more. Finally I saw Google Analytics, it turns out to be very feasible and easy to integrate into my Next.js app.
This post is intended for those that have already set up next.js blog on live site (preferably vercel), and already knows a bit about how to setup Google Analytics on static site. (setting up google analytic account is beyong the scope of this post).
The planning phase
Before I started, I had zero idea on how to do it, but I had a plan, a blueprint, and the blueprint is as follow:
- I need to find a service to track my site, after several research Google Analytics is the go to choice for me.
- I need to find a way to get the (page views) data from Google Analytics, googleapis is the answer here.
- Since I do not have BE server on the codebase, I needed to set up a BE server. But wait, I am using Next.js, there is must be something they offer right?
Sure enough, Next.js has a really handy serverless like
APIRoutebuilt in support for any kinds of API (REST or GraphQL) development, that’s where I am going to fetch the page views data from Google Analytics. - Finally, I need to fetch the api data that I built from step 3 on the FE, to display the page views data on the individual post!
Looks easy when you have these blueprint-like "steps" since software engineering is about problem-solving, and solving a problem is best done through individual steps.
Set up google analytics
First we need to create some handy functions and I am going to explain them in detail after.
typescript// src/lib/gtag.ts// we will add this later in the `.env.local` fileexport const GA_TRACKING_ID = process.env.GA_TRACKING_ID as stringexport const pageview = (url: string, title: string) => {window.gtag('config', GA_TRACKING_ID, {page_location: url,page_title: title,})}export const event = ({eventName,category,label,value,}: {eventName: stringcategory?: stringlabel?: stringvalue?: string}) => {window.gtag('event', eventName, {event_category: category,event_label: label,value: value,})}
Let's go through this one by one.
GA_TRACKING_IDis the id where you will get in your Google Analytics account.pageviewtakes inurlandtitleas arguments, and triggergtagfunction from google analytic to track our site!eventfunction will utilize the globalgtagfunction which we will inject later by using google analytics script tag, and do all the analytic stuff.
Great, we have set up our handy utility functions, now let's move on to adding the google analytic script to the custom Document component!
tsx// src/pages/_document.tsximport Document, {Html,Head,Main,NextScript,} from 'next/document'import {GA_TRACKING_ID} from '../lib/gtag'export default class MyDocument extends Document {render() {return (<Html lang='en'><Head>{/* <!-- Global site tag (gtag.js) - Google Analytics --> */}<><scriptasyncsrc={`https://www.googletagmanager.com/gtag/js?id=${GA_TRACKING_ID}`}></script><scriptdangerouslySetInnerHTML={{__html: `window.dataLayer = window.dataLayer || [];function gtag(){dataLayer.push(arguments);}gtag('js', new Date());gtag('config', '${GA_TRACKING_ID}');`,}}/></></Head><body><Main /><NextScript /></body></Html>)}}
Ok, lot's of thing going on here, let me explain.
When you create a _document.tsx under pages directory, you are telling Next.js to use Custom Document.
Basically it let's you extends <html> and <body> tags, so all of the static page that Next.js generates, this file will be injected (sort of).
So you can see it's important we place our gtag here so everytime there is routing occur in our site, it will always keep this top level document properties,
and gtag will be available on every page, and that is what we want.
Handle route change
So far so good, we've set up our handy utility functions first, then we imported our gtag scripts.
Now we are going to utilize our little utility functions. Go ahead and add this script to your _app.tsx component.
tsx// src/pages/_app.tsx...import type {AppProps} from 'next/app'import {ThemeProvider} from 'next-themes'import {useEffect} from 'react'import {pageview} from '../lib/gtag'function MyApp({Component, pageProps, router}: AppProps) {useEffect(() => {const handleRouteChange = (url: string) => {pageview(url, document.title)}router.events.on('routeChangeComplete', handleRouteChange)return router.events.off('routeChangeComplete', handleRouteChange)}, [router.events])return <Component {...pageProps} />}
_app.tsx basically is your Next.js main entrance component. Think of it as app.tsx in your normal application or index.tsx.
We've used useEffect to listen to routeChangeComplete event, whenever this event fires, it will trigger handleRouteChange function,
which takes an in url as argument, and supply to our handy little function pageview function which we defined earlier.
This is where you've completed the recipe for sending and retriving page view data from google analytic.
Of course, don't forget to add a .env.local file in the root directory and add the tracking ID from google analytic.
textGA_TRACKING_ID=UA-XXXXXXXXX-X
Now if you restart your dev server and open up developer console, you should be able to see google analytic request.
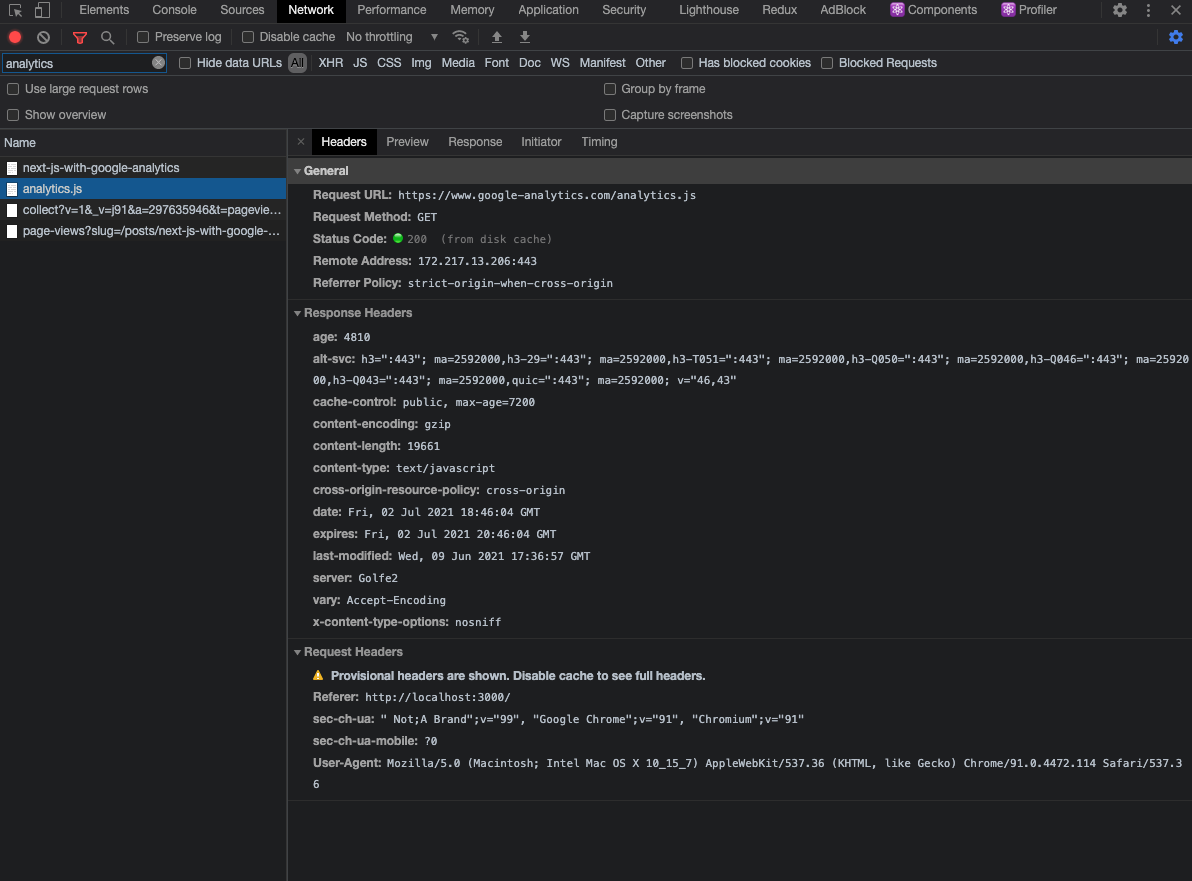
This means google analytic now activly monitoring your site!! Congratz!
Page view API
So far so good, we have set up our tracking tool, now we need to find a way to get the page views data from the google analytic api, and display it on the FE.
We will need couple of tools to make it happen. first we will use googleapis to make http request to get the page view data (for this we will need to create our own serverless api function that is built in with Next.js).
Last but not least I will be using useSWR, very cool fetch library to fetch the data from the serverless api that we created. Let's get to it!
API Routes
API Routes is a built in solution from Next.js to build a serverless like api function.
In the old days we would've setup a node.js express server manually, but now Next.js solves that! (It also has GraphQL supports, I will be talking about this in the future posts!).
To create a api route simply create a file called page-views.ts under src/api directory.
ts// src/api/page-views.tsimport {NextApiRequest, NextApiResponse} from 'next'module.exports = async (req: NextApiRequest, res: NextApiResponse) => {try {return res.status(200).json({pageViews: 0,})} catch (error) {return res.status(500).json({error: error.message})}}
The syntax is very similar to a serverless function syntax, where each file represents a api route. Next.js also provides very nice typescript support for the function arguments.
Now go to your browser and hit localhost:3000/api/page-views, then you should be able to see the requested data coming back!
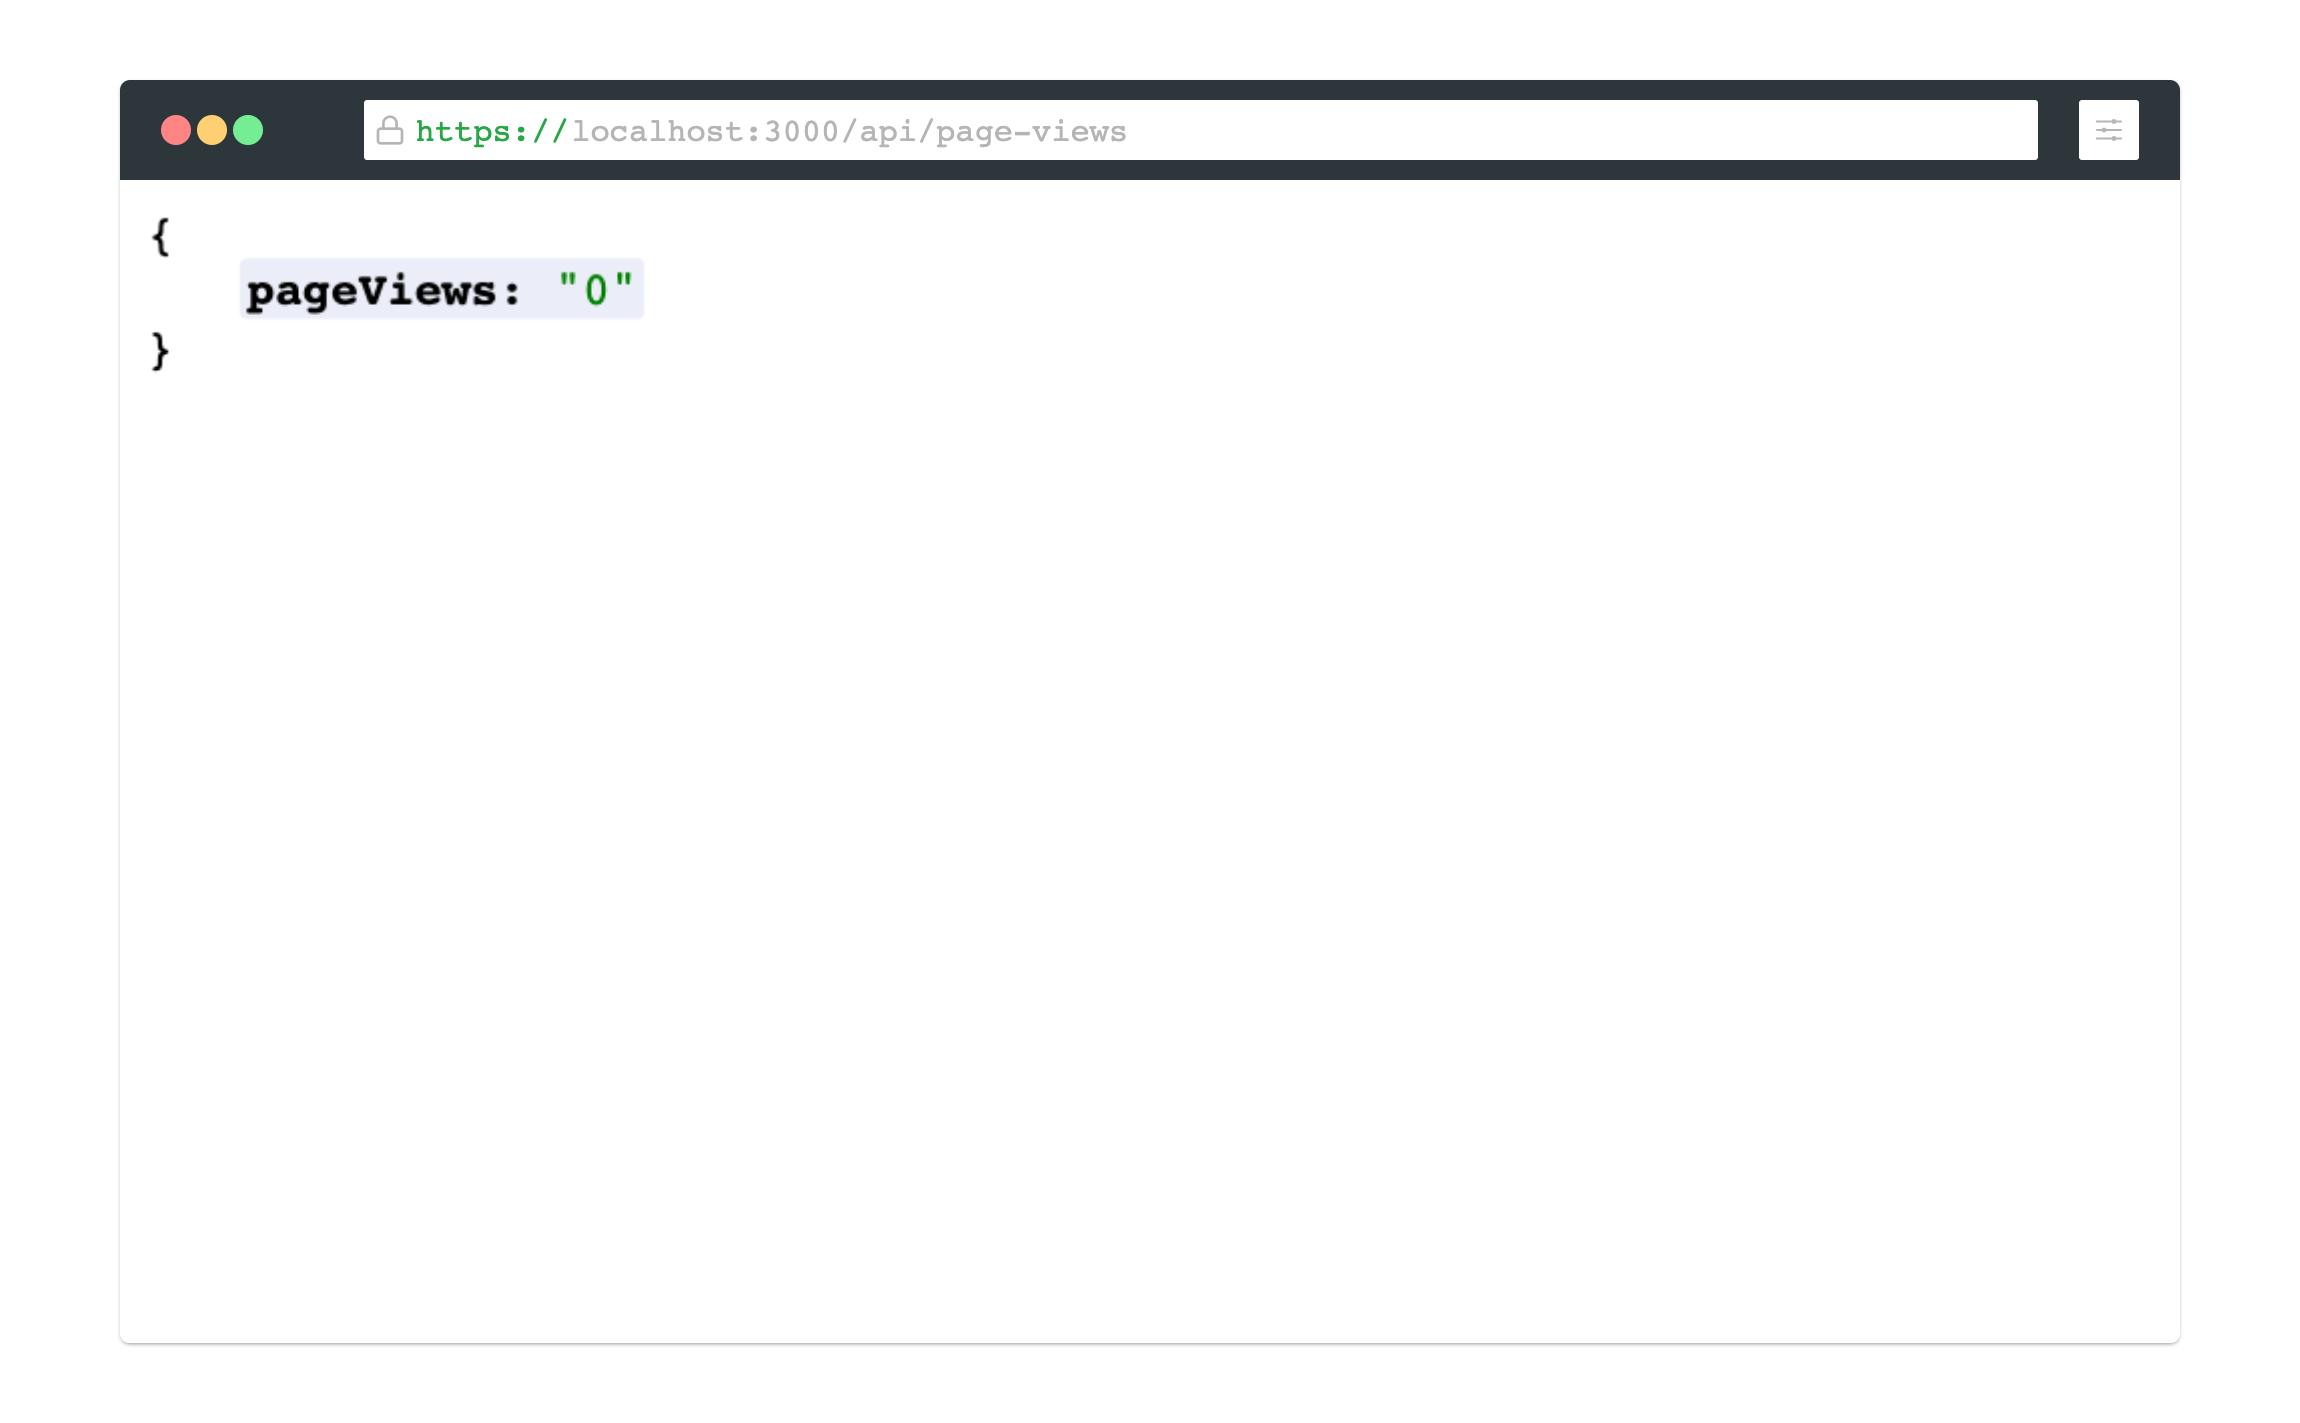
So far so good, we have set up our little "serverless" REST Api end point, next step is to install googleapis.
shellyarn add googleapis
Setting up Google api
Before we can use google api, we need to be connected to the api from our account. So follow these steps (Steps may vary from different people and different account, consult google api docs and google developer docs if you have any questions).
- Go to the Google Developer Console
- Create a new project if you haven't done so already.
- On the left hand menu, click on
Credentials, and click on+ CREATE CREDENTIALSand chooseService account. - Fill in the details, and after created the service account, go to the detail view of that service account, and click
SHOW DOMAIN-WIDE DELEGATION. - Make sure you click
Enable Google Workspace Domain-wide Delegation. - Click on
KEYSand clickADD KEYbutton, and chooseCreate new key, and chooseJSONand you will download your private key and all the authentication related stuff in thatJSONfile, so keep it safe. - Navigate back to the APIs & Services home page and click
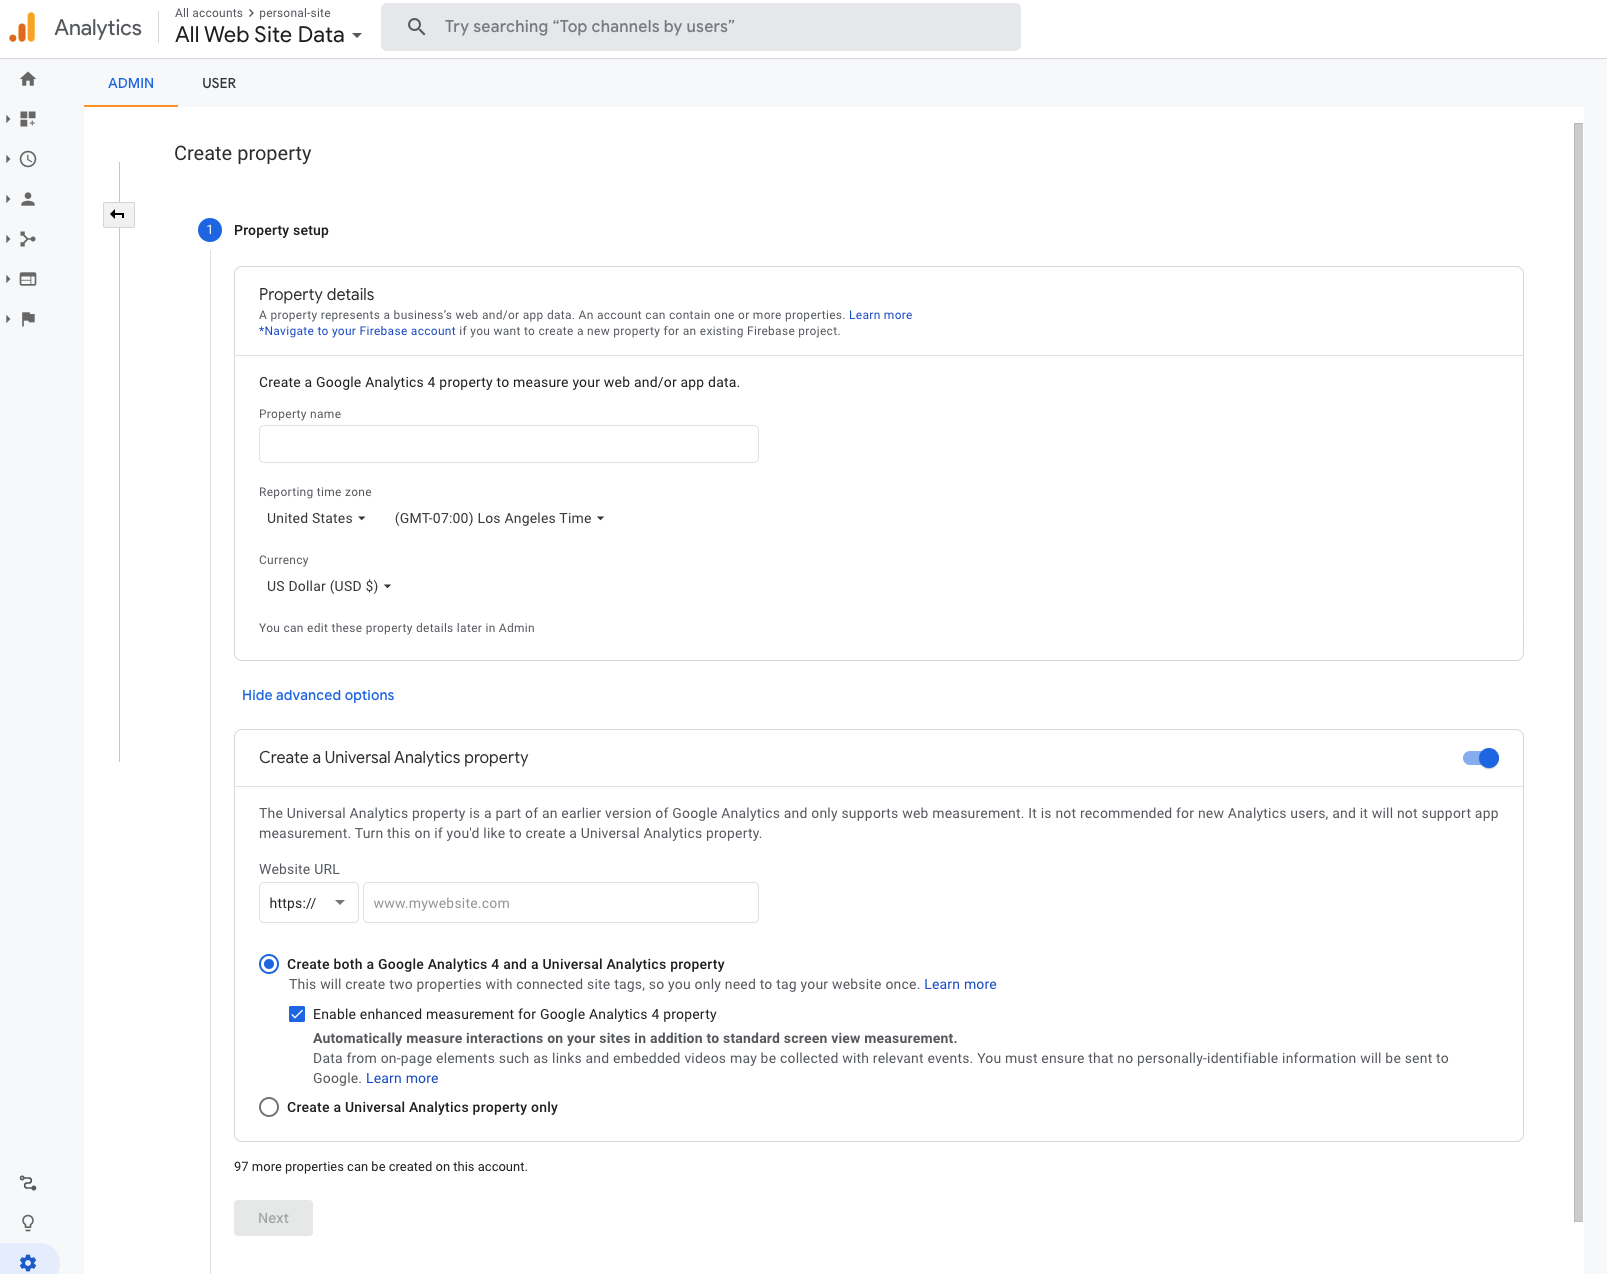
+ ENABLE APIS AND SERVICES, and pickGoogle Analytics APIand enable it. - Once enabled the google analytic api, go to the admin panel of google analytics and add a new property, and make sure to selected
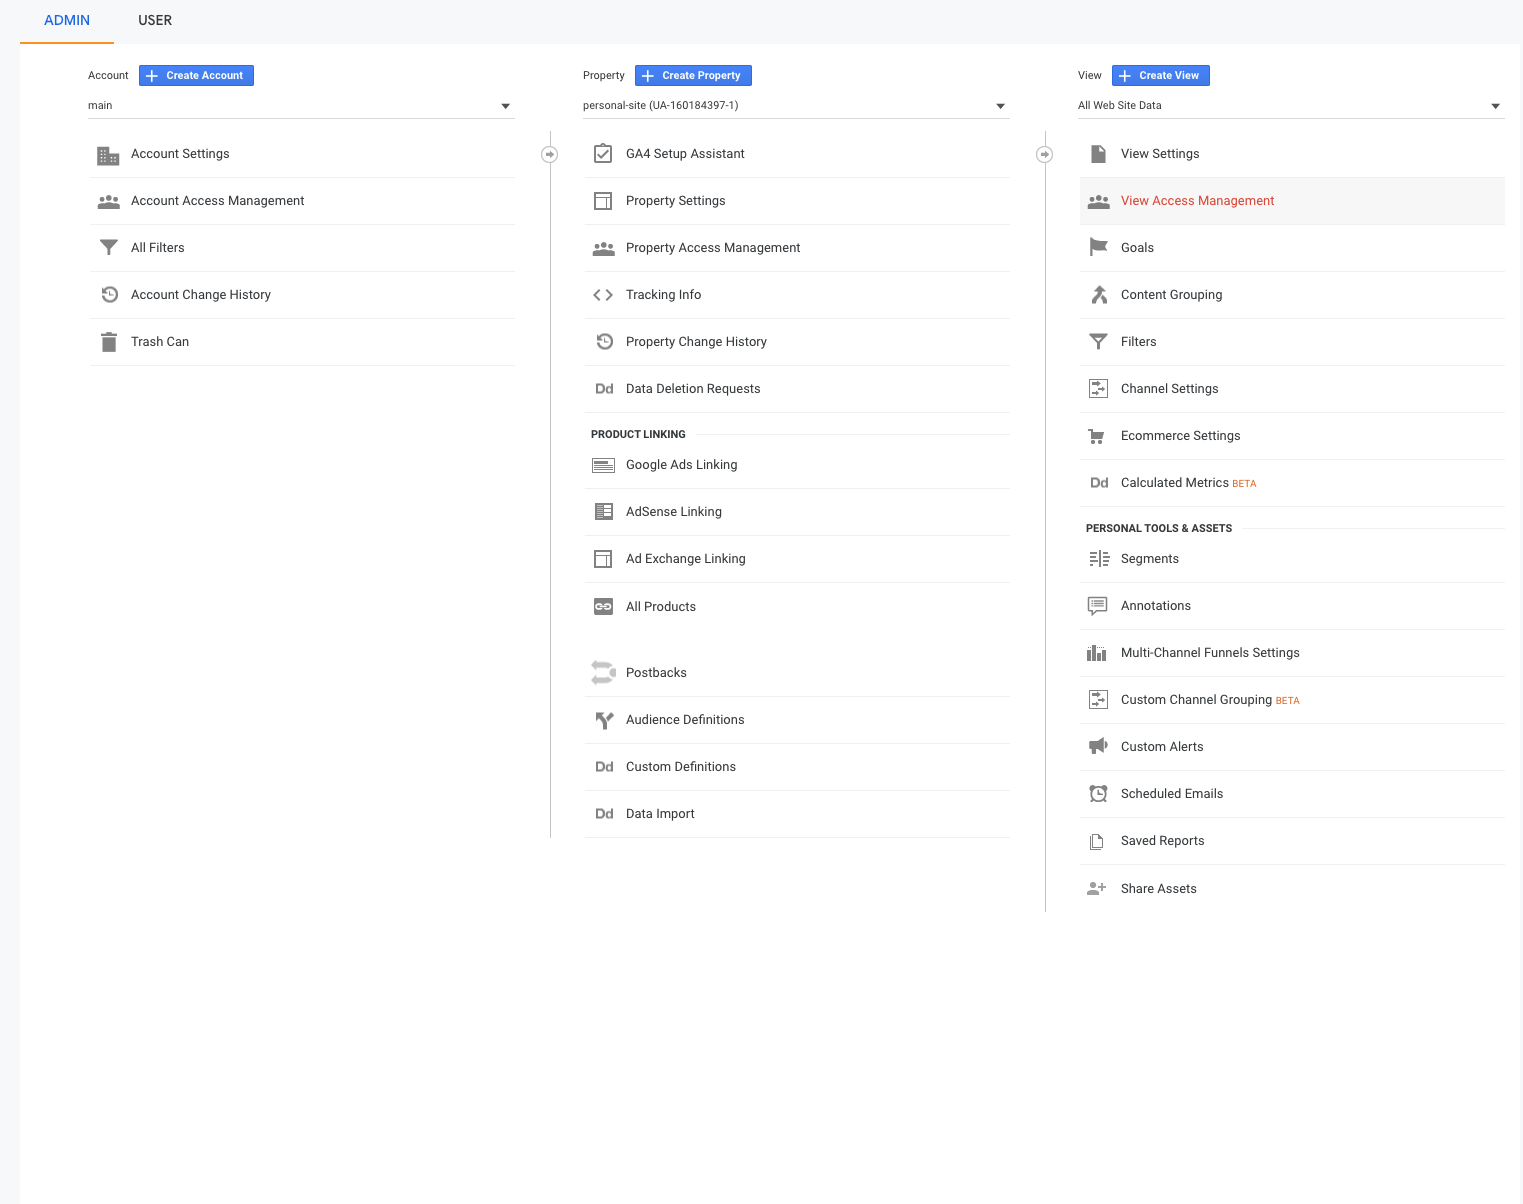
Create a Universal Analytics property, and add your website URL. - Last step would be to add the newly created service account to the list of users in the google analytics view access management.
Google analytics create property
Google analytics view access management
Phew, that was a lot of steps, hopefully it all worked out for you, because if it didn't I might need to add more steps to explain, and keep in mind google changes thier website all the time, so it might not be the same as this in the future (Me from the future!).
Now let's configure our enviromental variable, keeping API Key safe should be the fundemental for all developers. Add these variables into the .env.local file.
text// src/.env.localGOOGLE_ANALYTICS_VIEW_ID=123456789GOOGLE_CLIENT_EMAIL-service-account@xxx.iam.gserviceaccount.comGOOGLE_CLIENT_ID=123456789GOOGLE_PRIVATE_KEY="-----BEGIN PRIVATE KEY-----\nKEY\n-----END PRIVATE KEY-----\n"
GOOGLE_ANALYTICS_VIEW_ID you can find in the admin panel under the View Settings.
The other values are in the JSON file you saved in the step previously:
GOOGLE_CLIENT_EMAIL = client_email
GOOGLE_CLIENT_ID = client_id
GOOGLE_PRIVATE_KEY = private_key
After everything is done, kill your server if it's running and restart it, because Next.js needs to know there are new env variables.
Let's start coding our APIs:
ts// src/api/page-views.tsimport {NextApiRequest, NextApiResponse} from 'next'import {google} from 'googleapis'module.exports = async (req: NextApiRequest, res: NextApiResponse) => {const {startDate = '2021-01-01', slug} = req.querytry {const auth = new google.auth.GoogleAuth({credentials: {client_email: process.env.GOOGLE_CLIENT_EMAIL,client_id: process.env.GOOGLE_CLIENT_ID,private_key: process.env.GOOGLE_PRIVATE_KEY,},scopes: ['https://www.googleapis.com/auth/analytics.readonly'],})return res.status(200).json({pageViews: 0,})} catch (error) {return res.status(500).json({error: error.message})}}
We are basically just yelling at google api like "hey, here are the credentials, let me in!!". Next we need to instantiate Google Analytics client and perform the api call and get the data that we want!
ts// src/api/page-views.tsimport {NextApiRequest, NextApiResponse} from 'next'import {google} from 'googleapis'module.exports = async (req: NextApiRequest, res: NextApiResponse) => {const {startDate = '2021-01-01', slug} = req.querytry {...const analytics = google.analytics({auth,version: 'v3',})const response = await analytics.data.ga.get({'end-date': 'today',ids: `ga:${process.env.GOOGLE_ANALYTICS_VIEW_ID}`,metrics: 'ga:pageviews',dimensions: 'ga:pagePath',filters: `ga:pagePath==${slug}`,'start-date': startDate as string,})const pageViews = response?.data?.totalsForAllResults?.['ga:pageviews']return res.status(200).json({pageViews,})} catch (error) {return res.status(500).json({error: error.message})}}
Alright, again lot's of things are happening, let me go through them individually. I am assuming you already familier with async await so I am not going to explain that here.
Basically after auth with googleapis, we then grab the analytics object, and performing a call to the api and get the approriate response.
- The
filtersparameter ensures we are restricted to the specific slug URL. - The
startDateparameter, if not provided, will fallback to2021-01-01.
Now go to the api url and let's check if it's working. (Note: my posts directory starts with /posts/_slug_, yours might be different).
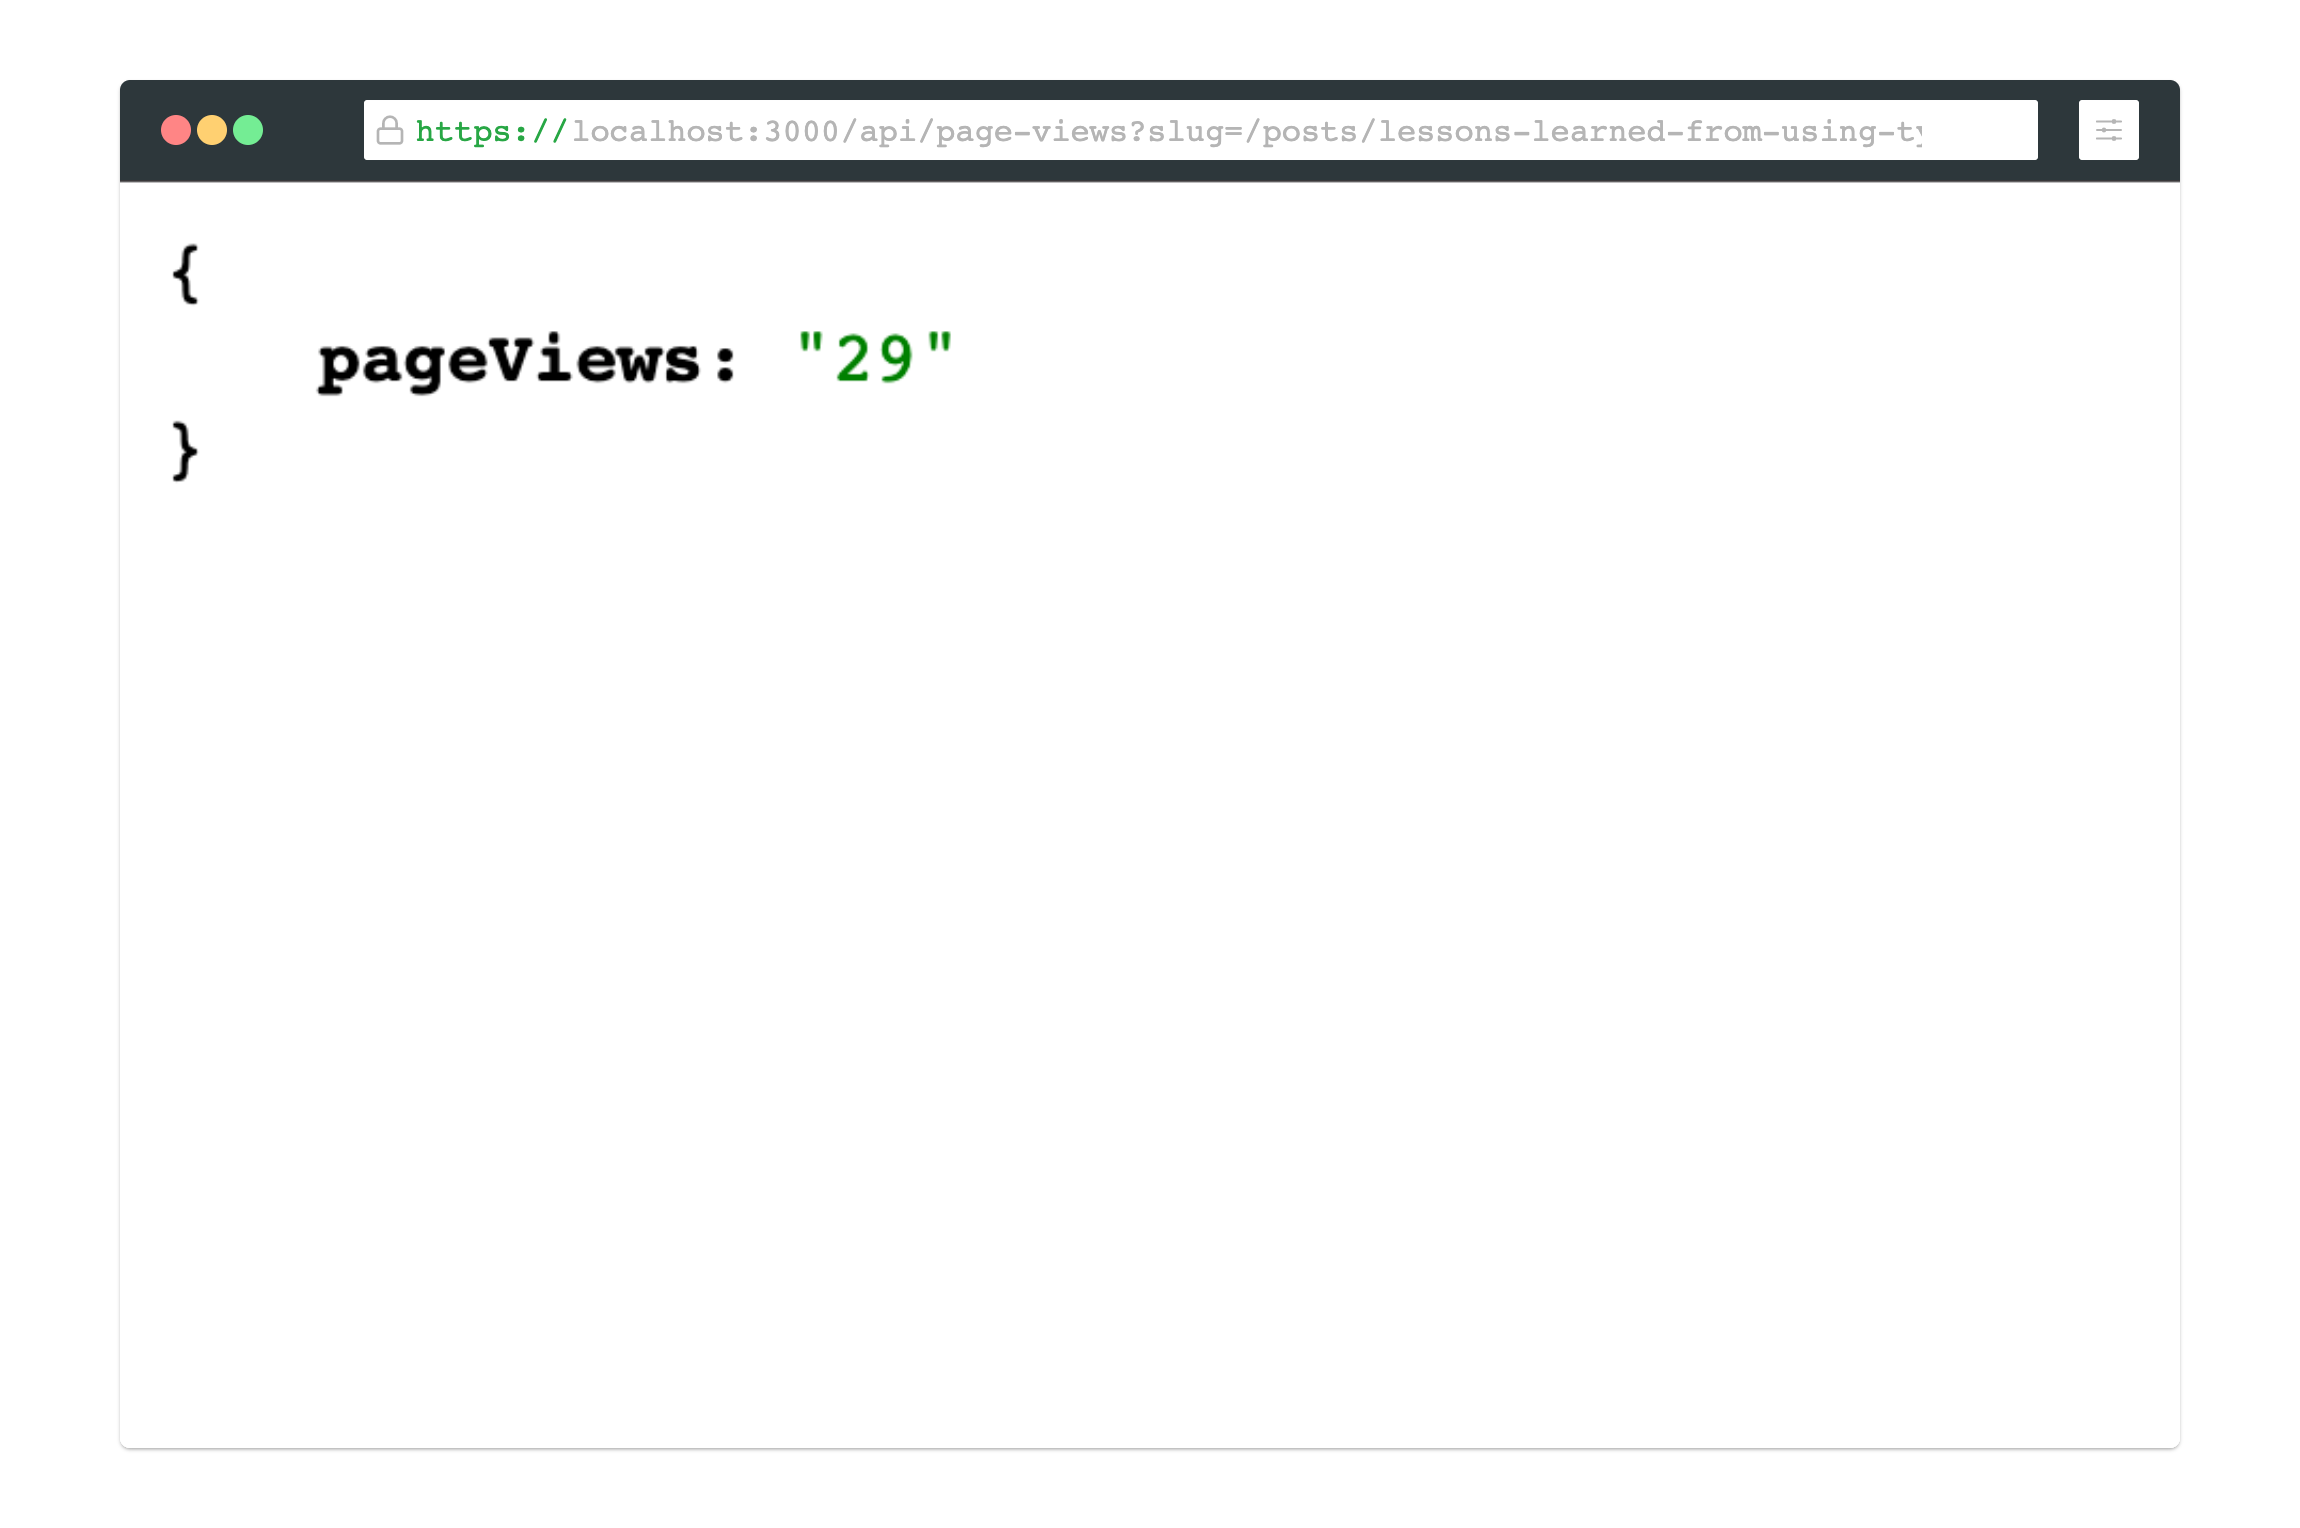
So far so good? Alright, let's now get this data display on the Frontend.
Display page views
On the Frontend it's going to be very easy, you just need to fetch the api using whatever tools you want, for example most commonly axois, but I am in for this little cool library called useSWR. I will be writing about this package in the later posts, but for now let's stick to our tutorial on how to display the page views.
Go ahead and install SWR
shellyarn add swr
Now you can fetch your data however you want, this is really up to you, but I like to fetch on every post page detail view.
tsx// src/posts/[slug].tsximport useSWR from 'swr'const Post = ({slug, source, frontMatter}: PropsType) => {...const {data} = useSWR<{pageViews: number}>(`/api/page-views?slug=/posts/${slug}`,async (url: string) => {const res = await fetch(url)return res.json()},{revalidateOnFocus: false,},)const views = data?.pageViews || 0return (<>...<div>{views} views</div>...</>)}
Now if you navigate to your post page, you should be able to see a api request, and you should be able to see the page views.
Awesome, if everything is looking good, congratz! You can call youself a fullstack dev, since you learned about creating a REST api, and also consume that API on the frontend.
That is it for this post, if you find it useful, don't worry I will be uploading more content in the future. See you in the next chapter!